Razorpay
Service Request ID: TP-INTG-PG-RZ

Overview
Razorpay is a leading payment gateway solution in India that enables businesses to accept, process, and disburse payments with ease. It supports a wide range of payment methods, including credit and debit cards, UPI, net banking, and digital wallets, making it a versatile choice for businesses of all sizes.
Prerequisites for Razorpay Integration:
-
Razorpay Account
You must create a Razorpay account. Visit Razorpay's website to sign up. You will need to complete the KYC process to start accepting payments. -
KYC Documents
Razorpay requires the following documents for KYC verification:- Proof of Business:
- Certificate of Incorporation / Partnership Deed / Trust Deed / Shops & Establishments Certificate
- GST Registration (if applicable)
- Proof of Identity of Business Owners:
- PAN card (mandatory)
- Proof of Address of Business Owners:
-
Passport / Voter ID / Aadhar Card / Driving License
-
- Proof of Business:
-
Bank Account Details
Ensure that you have an active business bank account in the name of your company or business, as Razorpay will require this information for payouts. -
Legal Documents and Policies
To comply with Razorpay's requirements, ensure that your website has the following policies:-
Terms and Conditions
A detailed "Terms and Conditions" page that outlines the rules, guidelines, and legal agreements that a user must agree to before using your services. -
Privacy Policy
A comprehensive "Privacy Policy" page that informs users about how their data is collected, used, and protected. This is required to comply with data protection laws and Razorpay's policies. -
Return and Refund Policy
A "Return and Refund Policy" page that clearly defines the process for handling returns, refunds, and exchanges of goods or services offered through your platform.
-
-
Verification Process
Once the documents are submitted, Razorpay will verify the details. This process can take 2-5 business days. -
Razorpay API Keys
After the KYC is verified, you can generate the API keys required for integration by navigating to the "API Keys" section in your Razorpay dashboard.
To start accepting payments via Razorpay on the NearMe platform, sellers need to follow a few simple steps. This guide provides a step-by-step process for setting up Razorpay.
Step 1: Create a Razorpay Account
-
Sign Up on Razorpay:
- Visit Razorpay and sign up for an account if you don’t already have one.
- Complete the onboarding process by submitting your business details and verifying your email.
-
Complete KYC Verification:
- Submit the necessary KYC documents, such as your business PAN, bank account details, and address proof.
- Wait for Razorpay to verify your documents and activate your account.
Step 2: Generate and Share API Keys
-
Access API Keys:
- Once your Razorpay account is active, log in to the Razorpay dashboard.
- Navigate to the “Settings” section and select “API Keys” to generate your API key and secret.
-
Share API Keys:
- Securely store the API key and secret.
- You can share these keys with the NearMe integration team to configure Razorpay for your store.
Step 3: Configuration by Wariyum Team
-
Integration Setup:
- The Wariyum support team will use the provided API keys to integrate Razorpay with your NearMe store.
-
Confirmation:
- Once the integration is complete, you will receive a notification confirming that Razorpay is active on your store.
Step 4: Start Accepting Payments
-
Verify Payment Methods:
- Log in to your NearMe dashboard and verify that Razorpay is enabled as a payment method.
- Conduct a test transaction if possible to ensure everything is working correctly.
-
Monitor Transactions:
- Regularly check the Razorpay section in your dashboard for transaction updates and manage payments effectively.
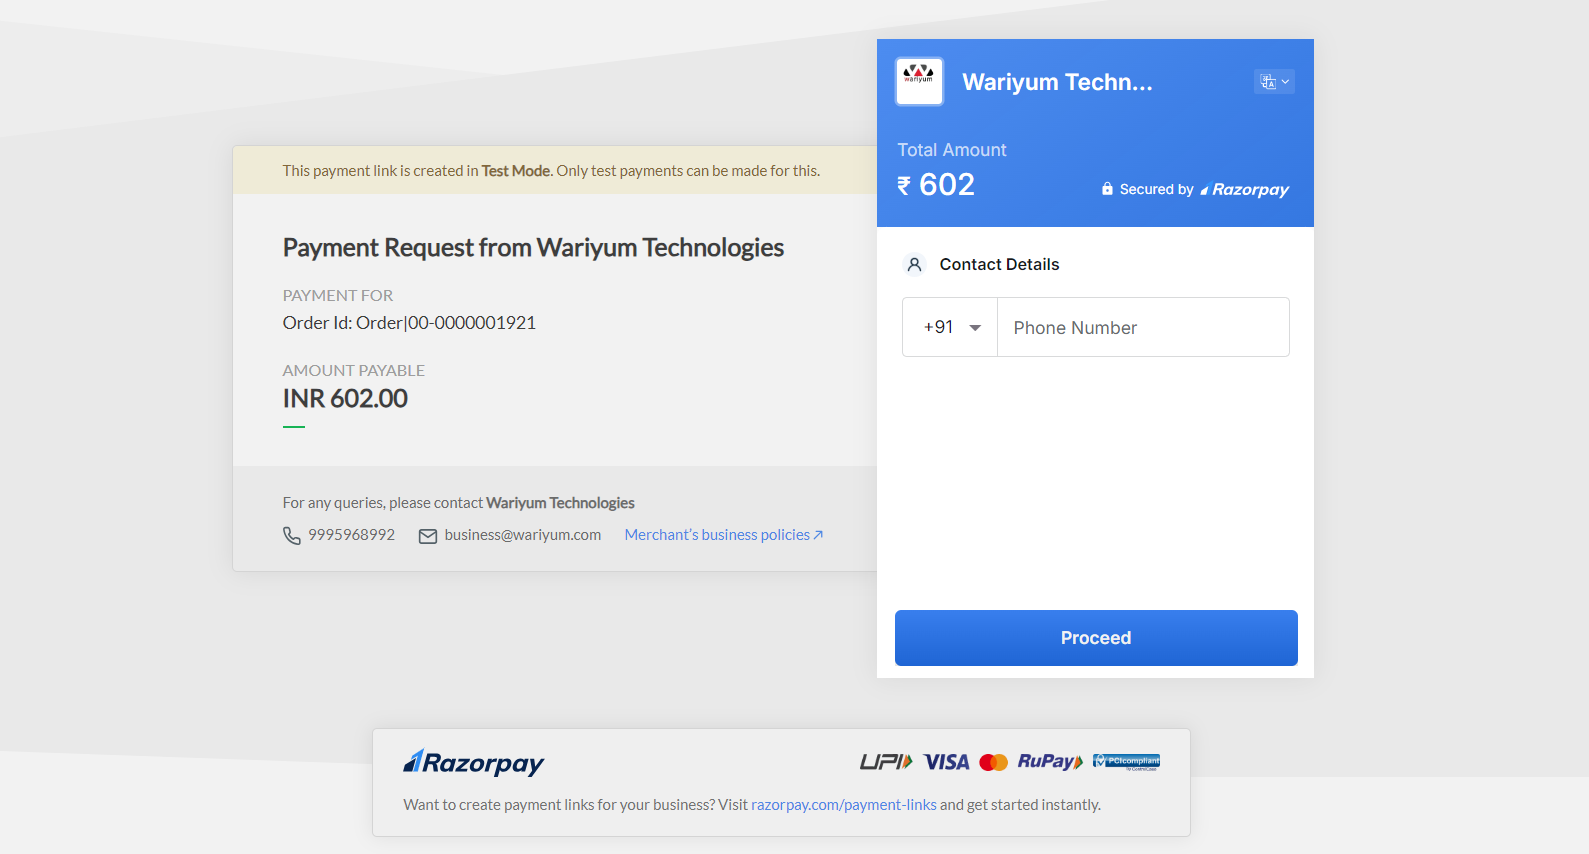
Storefront
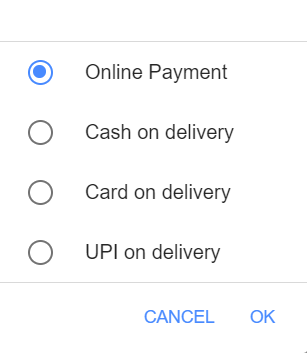
Select "online payment" as payment option.

Once you click the "Pay now" button, you'll be directed to the secure RazorPay payment page where you can proceed with your payment. Here, you'll find a seamless interface for completing your transaction with ease and confidence.
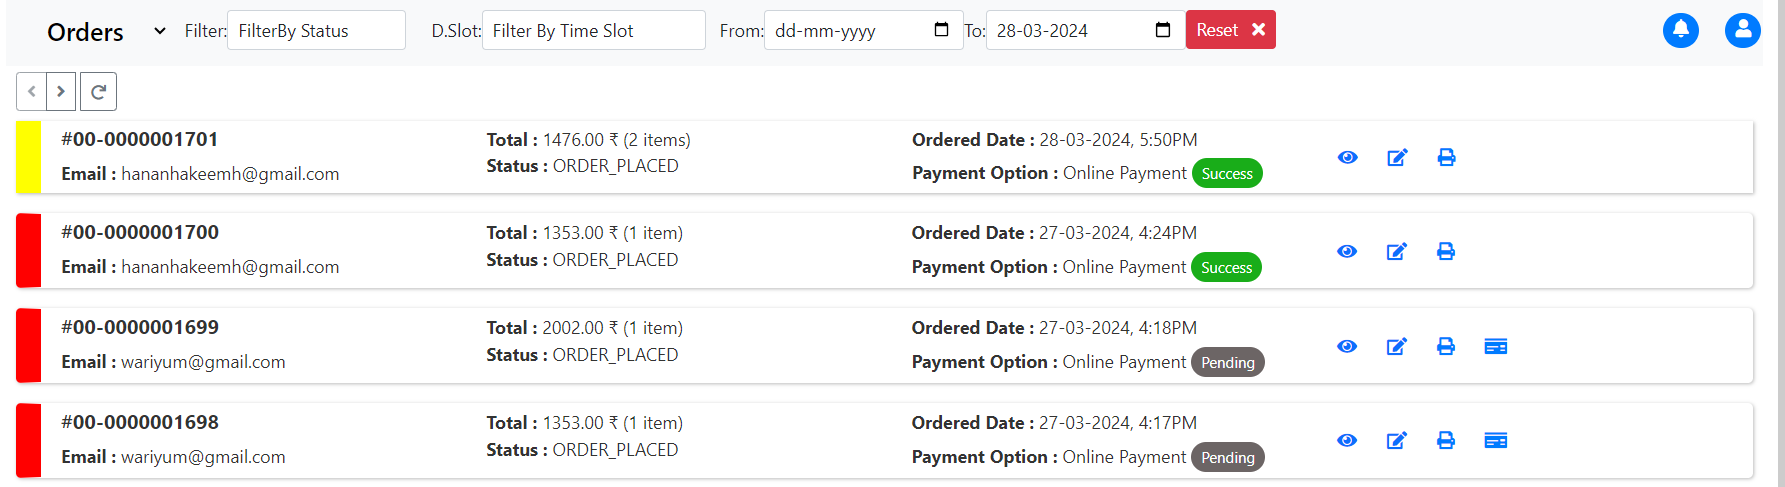
Navigator
On the orders page, you can easily monitor the progress of customer's transaction and stay informed about its current status. Whether it's pending, sucess, or failed, you'll have visibility into the payment's journey.
Magic Checkout
Service Request ID: RZ-MAGIC-CHECK
If you are already using Razorpay, you can upgrade to Magic Checkout for a faster, one-click experience for your customers. Magic Checkout auto-fills customer details, allows login with mobile number, and improves conversion rates.
Benefits of Magic Checkout
- Login with Mobile Number – customers verify with OTP, no need for separate accounts.
- Auto-Filled Checkout – name, email, phone, and address are remembered for repeat orders.
- Shared Customer Network – if a customer has used Magic Checkout anywhere, their details auto-fill on your store too.
- Higher Conversion Rates – fewer form fields = fewer cart abandonments.
- Reduced COD Returns – Razorpay detects risky or fake COD orders.
- Secure & Trusted – PCI-DSS compliant, powered by Razorpay.
Requesting Magic Checkout
Magic Checkout is not enabled automatically. You must request it.
How to Request:
-
Login to your Razorpay Dashboard
-
Navigate to Magic Checkout under Payment Products
-
Click Request Access / Enable
-
If the option is not visible, contact Razorpay Support:
- 📩 support@razorpay.com
- 📞 +91-80-62772200
How It Works for Your Customers
First-Time Customer
- Customer enters their mobile number at checkout.
- Receives an OTP for verification.
- Enters name, email, and address once.
- Razorpay securely saves these details.
Returning Customer
- Enters only their mobile number → verifies with OTP.
- Razorpay auto-fills their details instantly.
- They just choose payment method and confirm order.
- Works across any website using Magic Checkout, not just yours.